The past few weeks, I've been grinding a game called Marvel Rivals — and losing. Badly. Like, 20 games in a row badly. Peak gaming career low.
After hours of pain and broken spirit, I finally alt-tabbed out and thought: "Maybe... I should be doing something more productive with my time."
With internships coming up, I figured it was time to lock in.
I remembered I had an old gaming PC collecting dust in the closet. Originally, I was just going to wipe it and install Linux — but then I thought: "Wait... can't I turn this thing into a server?"
It wasn't some ancient relic either — for 2015, it actually had pretty solid hardware. And just like that, the idea was born.
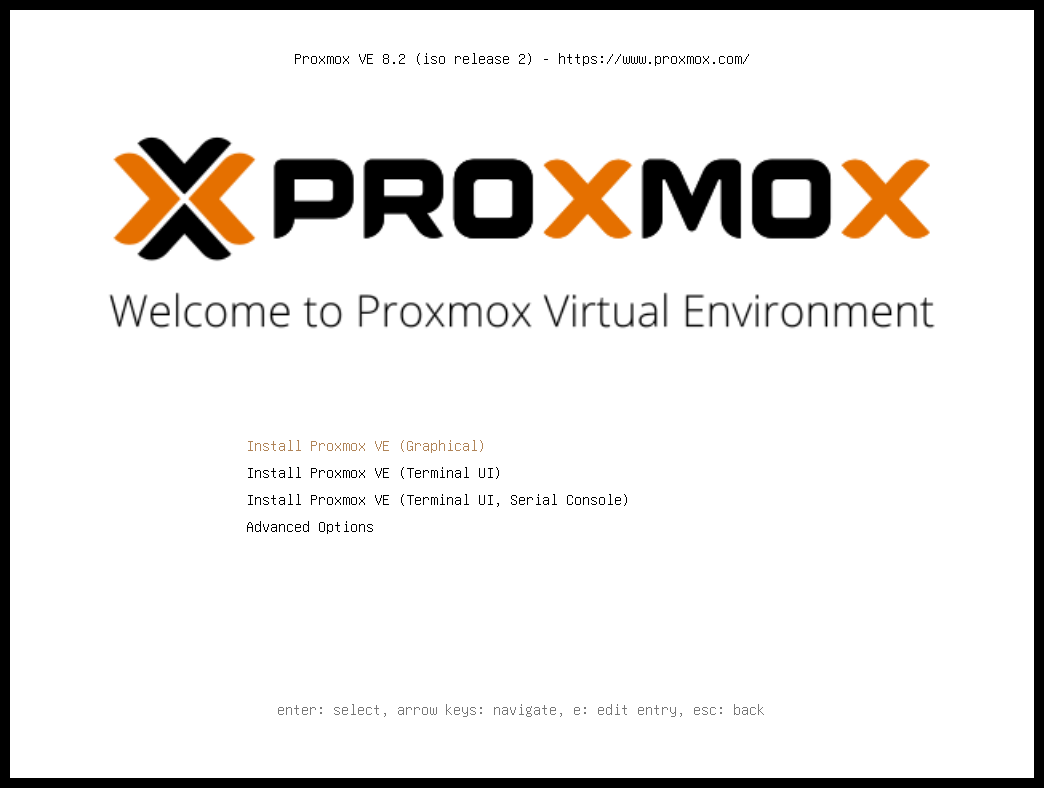
Let's install Proxmox!
I'm not gonna lie — all I really knew about Proxmox was that it was essential for any respectable homelab setup. So naturally, I Googled "how to install Proxmox" — and when I saw a YouTube thumbnail that said "Nerds Tools for Nerds," I knew I was exactly where I needed to be.
Thankfully, thanks to my tragic experience working in computer repair — and the countless BSODs I caused building PCs for friends — I already knew how to make a bootable drive and mount an ISO.
The install process was simple: boot it up, create a user and password, and then, with a very serious pushes glasses up, I was in.
Security First
Now initially, I thought that was it. I was ready to move forward, spin up some VMs, and start building a Windows Server environment for an Active Directory hardening project I had in mind.
But as I clicked around, a few things started raising some eyebrows.
Out of the box, Proxmox had some pretty questionable security practices:
- Root SSH login was allowed — meaning attackers could go straight for the crown.
- SSH password authentication was enabled — making brute-force attacks way too easy.
- No two-factor authentication (2FA) for GUI logins — just a single password standing between someone and your entire server.
In other words: it's great for a homelab — but if you're not careful, it's like hanging a big neon sign over your server that says "Hack me, please."
Enter Tailscale
I remembered that at all the places I worked, people always had to use some kind of VPN to connect to sensitive resources. Most of the time, it was something like Palo Alto GlobalProtect, or some flavor of it. So I figured... why not replicate that here in my homelab?
Now, I want to be fully transparent:
I tried to install WireGuard first.
But manually configuring WireGuard at 1 AM — fueled only by a can of Monster and a pile of gummy worms — was... well... a losing battle.
So I pivoted to Tailscale.
And honestly, it was love at first tailscale up.
The setup was so simple, it was almost concerning.
Is this thing even on? Is it even working?
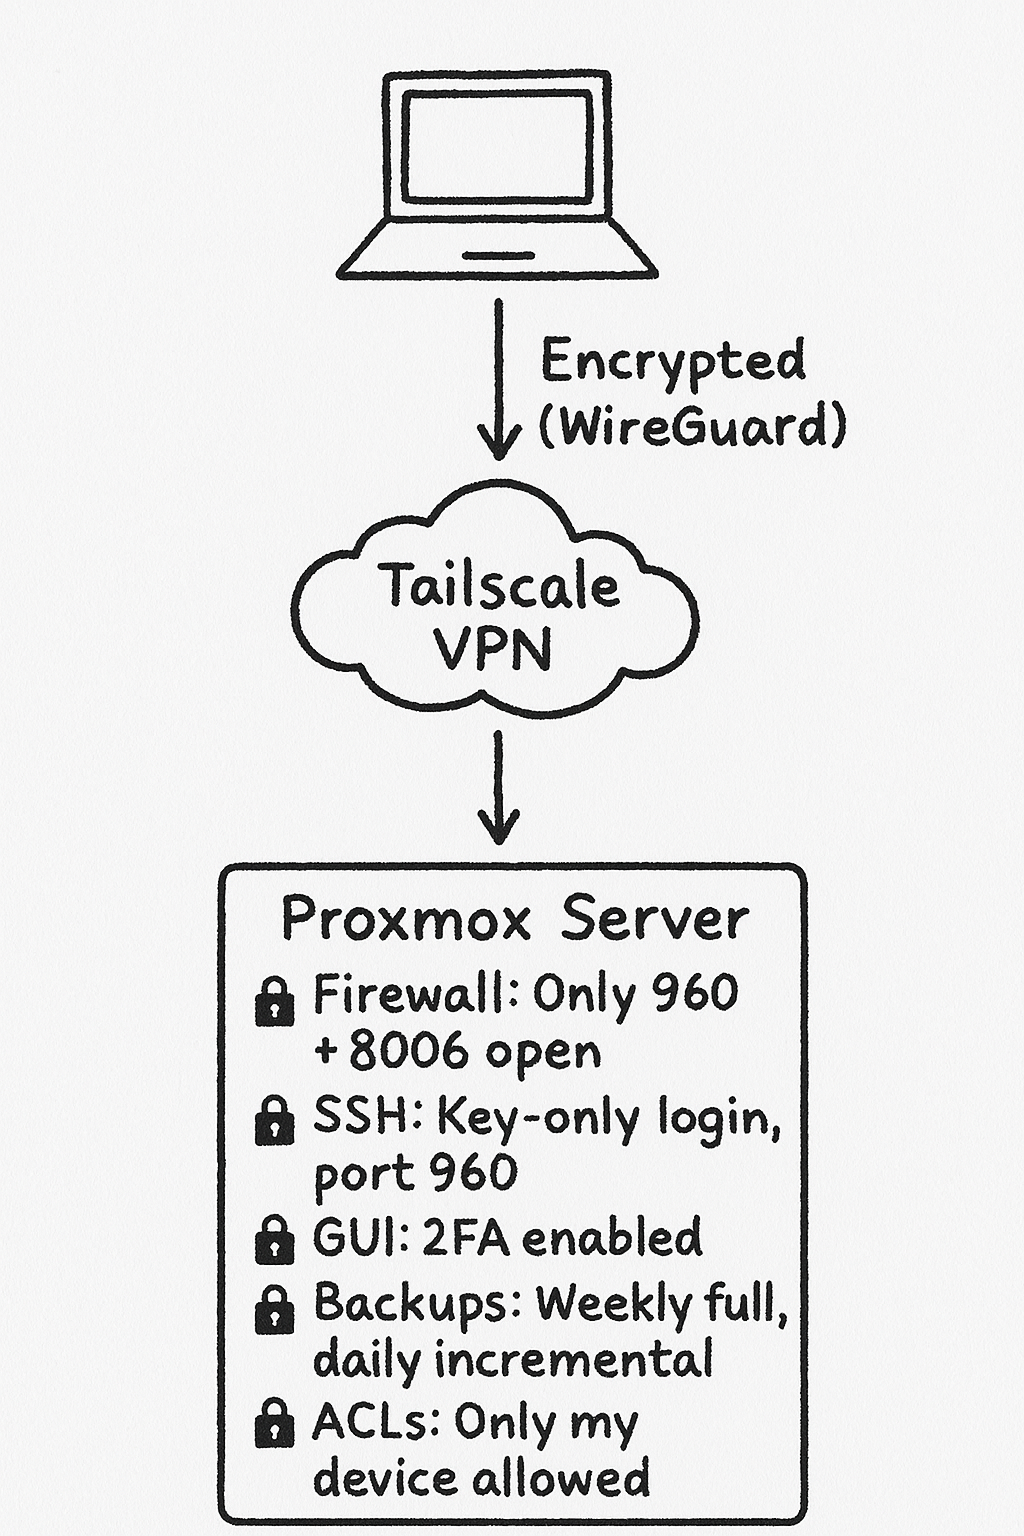
Why Tailscale?
- Almost a one-button setup and deploy — no servers, no firewall headaches.
- Peer-to-peer connections — faster and more direct communication between devices.
- Built on top of WireGuard — strong encryption without the manual setup pain.
- Zero-trust networking baked in — control exactly who can access what, by default.
Firewall Configuration
Even though Tailscale already hides the server behind an encrypted private network, it's always a good idea to build multiple layers of defense.
First, I installed UFW — a simple firewall management tool — and set some clean, minimal rules:
- Allow SSH traffic on my new custom port (960/tcp)
- Allow Proxmox Web GUI access (8006/tcp)
- Deny all other incoming traffic by default
- Allow all outgoing traffic (so updates, packages, etc. still work)
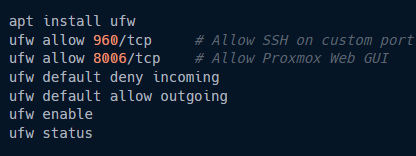
After enabling UFW, my server only exposed exactly what I needed — nothing more, nothing less.
And since I moved SSH off the default port 22, the evil hacker bots scanning the internet won't even see me anymore.
Total "I'm Batman" moment. 🦇
Securing SSH Access
Next up: Let's get rid of the default root SSH access Proxmox sets up out of the box.
Here's the plan:
- Create a new user to replace direct root SSH access.
- Configure proper permissions so the new user can still manage the system.
- Disable SSH login for the root user.
This way, brute-force attacks will be way less effective — or at least, that's the plan.
(And hey, even if they guess my password, they won't even be able to log in as root.)
Key-Based Authentication
Wait... are we still using passwords in 2025??
We're sending Katy Perry to space, but I'm still supposed to type in password123?? Yeah, no thanks.

Here's what I did:
- Generated a strong SSH key pair (using ED25519 — stronger and faster than RSA).
- Copied the public key to
/home/user/.ssh/authorized_keyson the server. - Adjusted private key permissions with
icaclsto prevent Windows SSH complaints. - Disabled password login entirely in the SSH configuration.
- Enabled public key authentication.
- Restarted the SSH service to apply the changes.

Now? No key, no entry.
Quality of Life Improvements
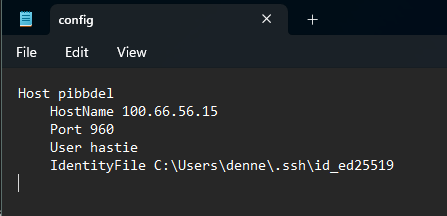
To make connecting a little smoother, I created a quick SSH config file at ~/.ssh/config on my laptop. Now, instead of typing out the full IP and port every time, I just type ssh pibbdel — and boom, I'm in.
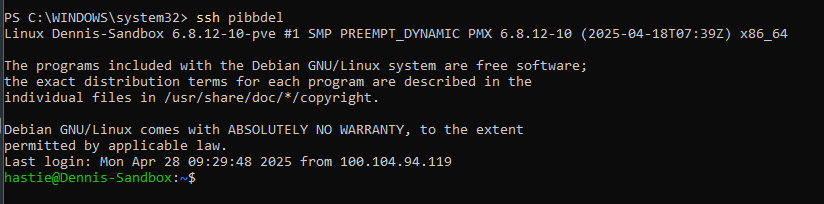
Work smarter, not harder.
Two-Factor Authentication
Next, even though traffic was already encrypted through Tailscale, I wasn't about to leave the front door unlocked.
I logged into the Proxmox Web GUI, navigated to Datacenter > Realms > pam > Edit, and enabled TOTP (Time-Based One-Time Passwords). Then I went to Datacenter > Two Factor > Add > TOTP and linked it to my mobile authenticator app.
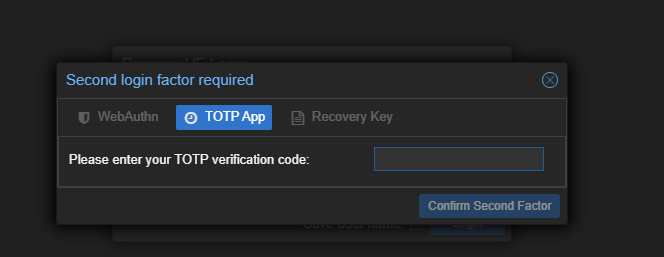
Now, logging into the GUI requires both my password and a code from my phone.
Double locks, double headaches for anyone trying to break in.
Access Control Lists
Finally, I tightened things up even more by configuring Tailscale ACLs.
I edited my Tailscale settings so that only my device (authenticated under denneytho@gmail.com) is allowed to:
- Access the Proxmox Web GUI on port
8006 - SSH into the server on port
960
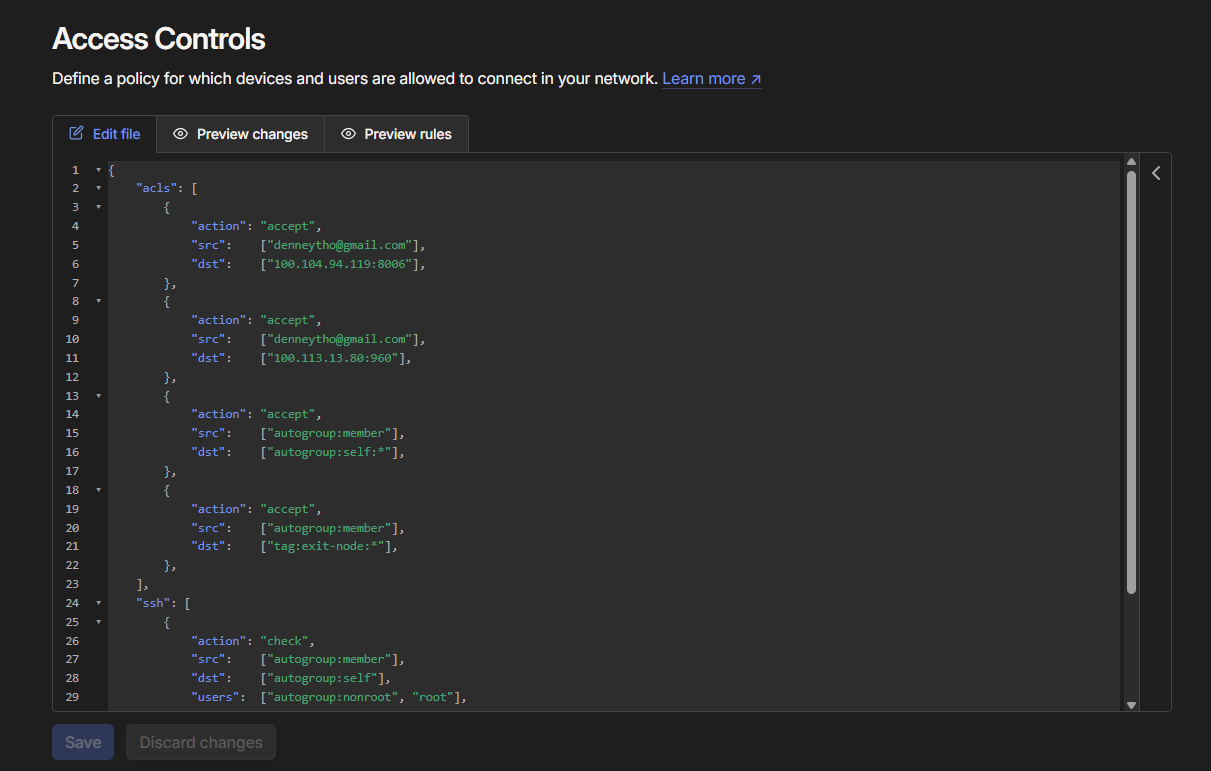
Every other user, device, or random machine trying to sniff around?
Blocked by default.
Zero trust, zero problems.
Backups
Oh — and one last thing: Backups. Always backups.
I set up Proxmox to automatically back up my virtual machines (VMs) to local storage.
Through the Web GUI, I created a simple backup schedule:
- Full backups every week
- Incremental backups every night
And I configured email alerts too — so if something goes wrong during a backup, I'll actually know about it before everything burns down.
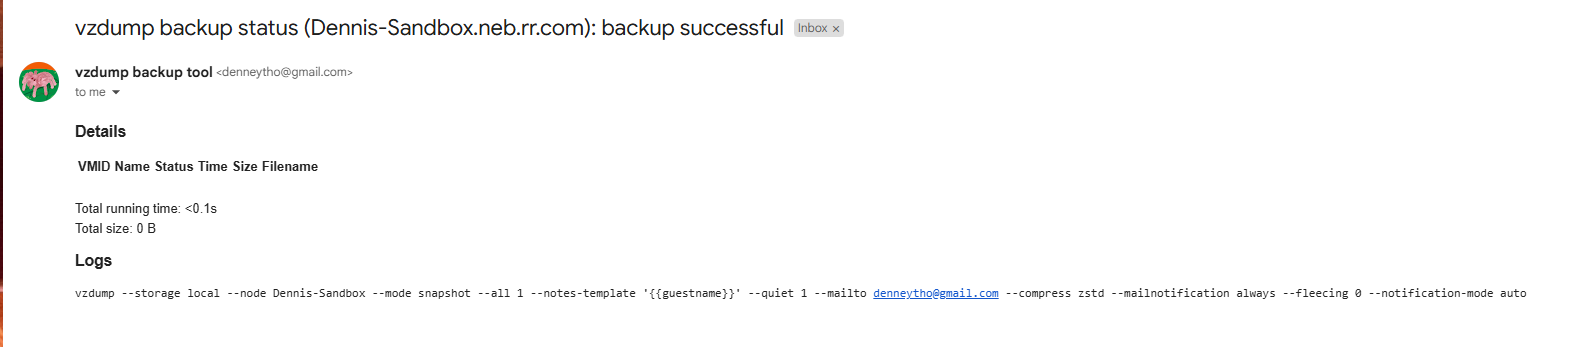
Because at the end of the day having no back up solution to basically anything you own, sucks.
Final Thoughts
I learned a lot through this project — not just technically, but mentally too. It pushed me to slow down, troubleshoot smarter, and think more like an actual security engineer.
Projects like this are never truly "finished." There’s always something to improve, fix, or harden just a little more. Honestly, that’s what makes it feel real — because in IT, things are always changing, breaking, and evolving.
I’ll keep building, breaking, and learning. This is just the beginning.